You can exercise the basics of MQTT in the menu “PC IOT” → §https://momoiot.co.kr/pc/iot/mqtt/no-security-mosquitto-client/
MQTT Exercise with WIFI Module (without Security)
Let’s set up MXCHIP’s WIFI module as an MQTT client and connect to MQTT Broker/Server to communicate.
1. Test system configuration
♦ Run MQTT broker on PC.
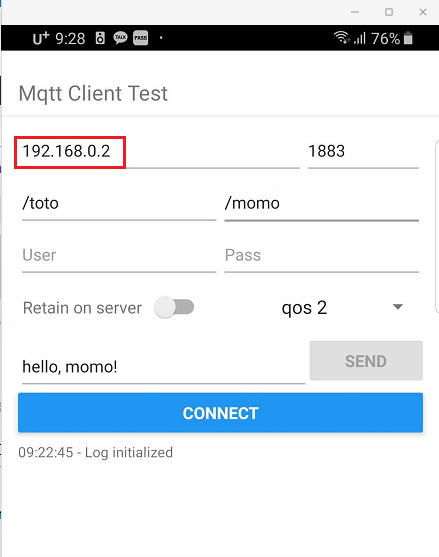
♦ Set the mobile phone’s MQTT client to subscribe to a topic called “/momo” and to publish a message to a topic called “/toto”.
♦ Set the WIFI Module subscribe to the topic “/toto” and publish a message to the topic “/momo“.
.

2. Set up MQTT Broker/Server on PC and MQTT Client on mobile.
First, check the IP of the PC(MQTT broker/server IP address), and then run the MQTT broker.
In the mobile MQTT client, set as shown on the right.


3. Set WIFI module as MQTT Client
| No | Command & Response | Description |
| 1 | AT+WJAP=MOMOIOT,momo1234\r | Connect to AP/AP router |
|
OK +WEVNET:STATION UP |
||
| 2 | AT+MQTTEVENT=ON\r | Enable function of the event push |
| OK | ||
| 3 | AT+MQTTSOCK=192.168.0.2,1883\r | Set the broker’s IP/URL and port for MQTT socket |
| OK | ||
| 4 | AT+MQTTCID=momo8zx2\r | Set client ID |
| OK | ||
| 5 | AT+MQTTSTART\r | Start MQTT service |
|
OK +MQTTEVENT:CONNECT,SUCCESS |
||
| 6 | AT+MQTTSUB=0,/momo,0\r | Set topic to subscribe |
|
OK +MQTTEVENT:0,SUBSCRIBE,SUCCESS |
||
| 7 | AT+MQTTPUB=/toto,0\r | Set topic to publish |
| OK | ||
| 8 | AT+MQTTSEND=6\r | Publish data |
| > | ||
| >123456 | Input data within 0.5sec after receiving “<“ | |
| +MQTTEVENT:PUBLISH,SUCCESS | ||
| 9 | AT+MQTTUNSUB=0\r | Unsubscribe from the topic |
|
OK +MQTTEVENT:0,UNSUBSCRIBE,SUCCESS |
||
| 10 | AT+MQTTCLOSE\r | Close MQTT service/socket |
|
OK +MQTTEVENT:CLOSE,SUCCESS |
4. 모바일에 MQTT Client 설정

