SIM7600, SIM7800, LTE Module, AT Command, SSL, TLS → Mbed-TLS, TLS 1.3, TCP, UDP, Encryption, Security
TCP(SSL/TLS) 암호화 통신연습
SSL feature includes SSL (Secure Socket Layer) and TLS (Transport Layer Security).
It is used to transport encrypted data based on TCP/IP protocol and SSL/TLS.
SSL/TLS usually works between Transport Layer and Application
⊕ 대부분의 제품에서 기능 구현은 주로 HTTP(S), MQTT(S)등의 응용계층을 이용하고 있고, 전송계층(TCP-SSL/TLS)을 이용하는 경우는 두믈므로,
이 Page에서는 개념 정도만 파악하고 갈 수 있도록 여러가지 모드 중에 한가지 동작모드 만을 예로 들고 있다.
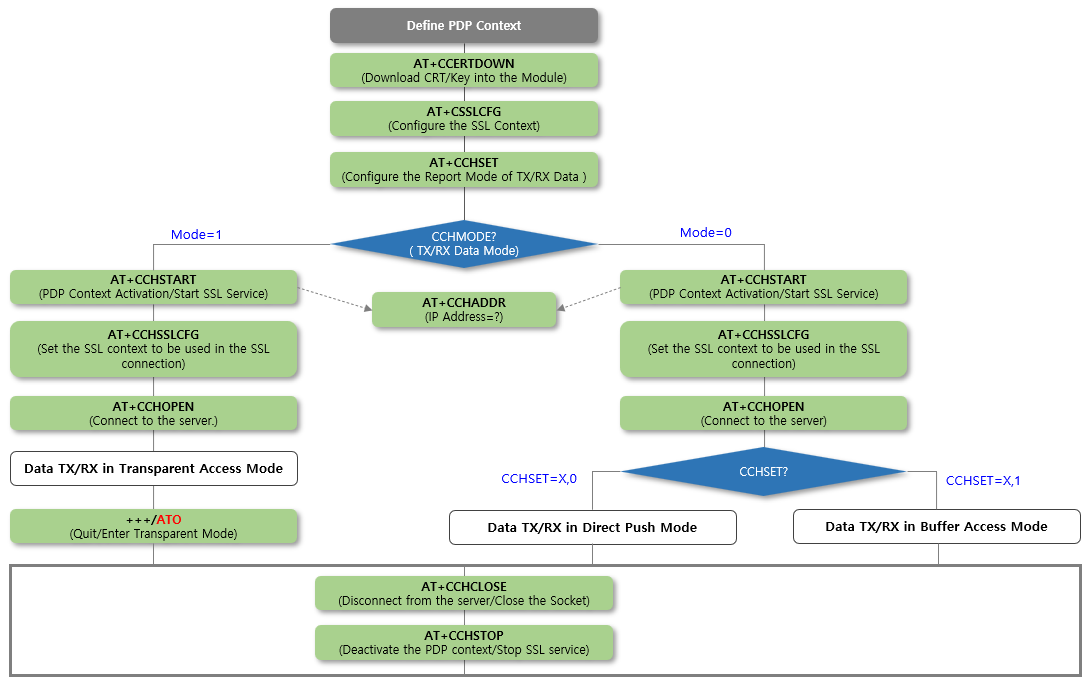
1. SSL/TLS 통신 설정과정
2. SSL/TLS 명령시퀀스(Server and Client 모두 검증을 하는 경우)
OpenSSL를 사용하는 경우 Server와 Client의 설정을 먼저 예로 들고 있다.
| OpenSSL | 명령의 예 | 설명 |
| 서버설정 |
openssl s_server -port 4433 -accept 4433\ -debug -tls1_2 -Verify 10 -status -msg -msgfile log \ -CAfile ca.pem -cert server_crt.pem -key server_key.pem\ -keyform PEM -named_curve secp521r1 |
-Verify 10: 클라이언트 인증을 강제함. -cert , -key: 서버인증서를 사용할 것. |
| 클라이언트설정 |
openssl s_client -connect XXX.XXX.XXX.101:4433 \ -showcerts -verify 10 -verify_return_error \ -CAfile ca.crt.pem -cert client_crt.pem -key client_key.pem |
-verify_return_error: 서버인증실패 시 프로그램 종료. -cert , -key: 클라이언트 인증서를 제출해야 함. |
Step1. PDP Context 설정 & 인증서 및 키 관리
| NO | Command | Response | 설명 |
| 1 | PDP Context 설정 | ||
| 2.1 | AT+CCERTDOWN=”ca.pem”,1602 | > | Download the certificate into the module. |
| 2.2 | > CA 인증서를 입력 | OK | Carefully input the Certificate |
| 3.1 | AT+CCERTDOWN=”cert.pem”,1740 | > | Download the certificate into the module. |
| 3.2 | > Client 인증서를 입력 | OK | Carefully input the Certificate |
| 4.1 | AT+CCERTDOWN=”key.pem”,8383 | > |
Download the Key into the module. |
| 4.2 | > Client Key를 입력 | OK | Carefully input the key |
| – AT+CCERTLIST | +CCERTLIST: “ca.pem” +CCERTLIST: “cert.pem” +CCERTLIST: “key.pem” |
List the certificates. | |
| – AT+CCERTDELE=”ca.pem” | OK | Delete the certificate. | |
Step2. Configure SSL Context
| 5 |
AT+CSSLCFG= “cacert”,0,“ca.pem” |
OK | Configure the server root CA. |
| 6 |
AT+CSSLCFG= “clientcert”,0,“cert.pem” |
OK | Configure the client certificate. |
| 7 |
AT+CSSLCFG= “clientkey”,0,“key.pem” |
OK | Configure the client key. |
| 8 | AT+CSSLCFG=”sslversion”,0,4 | OK | |
| 9 | AT+CSSLCFG=”authmode”,0,2 | OK | Configure SSL authentication mode. |
| – |
AT+CSSLCFG=“ignorlocaltime”, <ssl_ctx_index>,<ignoreltime> |
Configure the flag of ignore local time. | |
| – |
AT+CSSLCFG=“negotiatetime”, <ssl_ctx_index>,<negotiatetime>. |
Configure the max time in SSL negotiation stage. |
Step3. TCP(SSL) Communication
| 10 | AT+CCHSET=1,0 | OK | |
| 11 | AT+CCHMODE=0 | OK | |
| 12 | AT+CCHSTART |
OK +CCHSTART: 0 |
Activate the PDP context to start SSL service. |
| 13 | AT+CCHSSLCFG=0,0 | OK |
Set the SSL context used in SSL connection (if connect to SSL/TLS server) |
| 14 |
AT+CCHOPEN=0, “XXX.XXX.XXX.101”,443,2 |
OK +CCHOPEN: 0,0 |
Connect to the server. |
| 15.1 | AT+CCHSEND=0,29 | > | Send data to the server |
| 15.2 | > | +CCHRECV: DATA,0,1024 HTTP/1.0 400 Bad Request Content-Type: text/html; charset=UTF-8 Referrer-Policy: no-referrer Content-Length: 1555 Date: Sat, 18 Dec 2021 06:43:11 GMT<!DOCTYPE html> <html lang=en> <meta charset=utf-8> <meta name=viewport content=”initial-scale=1, minimum-scale=1, width=device-width”> <title>Error 400 (Bad Request)!!1</title> <style> |
Input 29 character of data |
| – | AT+CCHRECV |
Receive data from server when in manual receive mode. |
|
| 16 | AT+CCHCLOSE=0 |
+CCHCLOSE: 0,0 OK |
Disconnect from the server. |
| 17 | AT+CCHSTOP |
+CCHSTOP: 0 OK |
Deactivate the PDP context to stop SSL service. |
![]()
Radar Sensor SoC & Module
![]()
WiFi IoT Module
![]()
5G/LTE/CAT-M1/NB-IoT
![]()
WiSUN/HaLow/Thread Module
![]()